
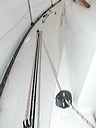
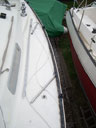
Genoa tracks
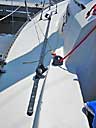
The photos show track and car arrangements aboard Legacy, Yogi Bear and Towser. Legacy and Yogi Bear have done enough winning to validate their tracks' placement. Towser shows an effective white-sail placement and the text details the components needed for Harken adjustable cars.
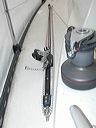
Legacy's tracks 1
Legacy's tracks 2
Yogi Bear's tracks 1

Yogi Bear's tracks 2
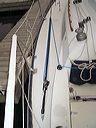
Towser's tracks
Blue Zulu's tracks
Yogi Bear's inside trim
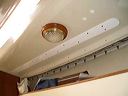
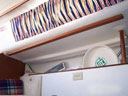
Towser's inside cover
Drilling & Sealing Holes in a Cored Deck
After many adventures in drilling holes in the deck, backing them up with tape and then filling the hole, only to find that (once again) the epoxy has loosened the tape and run through, I have learned to do the following, which I used to install my own 1" genoa tracks (see the note below if you already have holes that pass all the way through).
This method may seem fussy but it has a number of advantages beyond appearance. You preserve more of the fibreglass layers, which is where your strength is, it ensures that the surrounding balsa and laminate is wetted out with epoxy, and it gives better assurance that there are no voids or other weak spots in the deck, which can form if you drill all the way through, and then use epoxy so thick it won't run out the bottom hole.
On a personal note, I find it also reduces the number of panics caused by spilled materials and so makes the job go more smoothly.
My track uses 1-inch fender (oversized) washers to spread the loads. Recently, someone told me he intended to use a continuous strip of aluminum for its greater size and better load-carrying capability. I tried this, but as there is bonding putty between the deck and liner mouldings, more or less randomly placed, you can't slide anything between them. To put in a strip, you'd have to cut away all the liner or put the backing strip outside the liner.
- Lay masking tape over the entire work area (which is to say, over the whole length of the track and about one inch to either side), putting a ridge in the lower edge to trap excess epoxy that would otherwise run down the deck. Lay down several lines of tape over the track area, working from the lower side to the upper and overlapping the strips like shingles. Rub the tape down well, then position the track and mark the locations of fastener holes.
- With a drill bit about twice the diameter of the track fasteners, carefully drill down through the fibreglass upper deck skin and balsa core to just kiss the lower skin. Install a drill stop on the bit at that depth and drill everything else to that thickness.
- Dig out as much balsa as can be reached with an awl and vacuum the balsa out of the cavity. Attach an L-shaped piece of stiff wire to the drill (thick coat-hanger wire is good), insert the end in the hole and run the drill. Start with a piece of wire with a short leg on it, then repeat with a longer one. Vacuum the cavity clean.
- Using a syringe (an essential tool – it's amazing how much hassle
this eliminates), fill the hole with unthickened epoxy,
then go do something else for an hour or so. Again
with the syringe, suck any unthickened epoxy from the
hole, then re-fill it with cabosil-thickened epoxy.
You are using the unthickened epoxy to ensure that
the glass and balsa are thoroughly wetted, then cabosil-thickened
epoxy because it's harder and stronger than microballoons
or pure epoxy. Wipe up any mess carefully because epoxy
turns yellow on gelcoat. Do something else, like go
home or work on the bottom, so you won't absent-mindedly
walk over the goo on the tape.
- Come back and drill fastener-sized holes through the middle of your filled
hole, right through the deck and where applicable,
through the liner. Remove all the masking tape, taking
with it all spills, smears, etc. Holes should be slightly
larger than the fastener and should be beveled at the
top to ensure there is space for a good bit of
caulking at the top of the hole.
- From below, drill upward through the liner at the hole locations with a hole saw slightly larger than the largest fender washer you can find for your fasteners. Be super-careful to drill only the liner, not the lower skin of the deck. This is a hideously messy job, not to be contemplated if cushions are in. Wear eye protection and a dust mask.
- Dry fit the whole arrangement of track and fasteners. Lay masking tape alongside the track about 1/16 of an inch away. If you plan on covering the holes in the liner, mark the machine screws for length and cut them (they probably will be the same length).
- Put it all together. I used 3M 5200 as caulk. You need someone on deck to hold the screw head while you fit and tighten the fender washer and nut. I used nylock nuts; they are much less hassle than nuts and lock washers and are reasonably priced if you buy a box of 100 from a supplier like Noah's (see Links & Contacts). It is really helpful to have an electric drill fitted with a socket-holder and the appropriate-size socket to speed running up the nuts. Make the nuts snug, not so tight that you squeeze out all the caulk. Also, try not to get caulk around the bottom of the hole - if water does enter, you want it to run right through and alert you that the caulk has failed at the deck, not sit there looking for a way to get into the balsa.
- Next day, the caulk will have firmed up. With a matte knife or similar, slit the caulk that has squeezed out close to the track, then pull off the tape. Voilà, a clean deck without endless wiping with solvents. With an assistant holding the screw heads firmly (don't let the screw head turn or this will compromise the seal already formed around the screw), ensure that all nuts are well set.
- Install all the remaining gear. Fit a strip of white plexiglass or wood over the holes drilled in the headliner.
If you already have holes that pass all the way through and want to avoid the hassle with tape, noted above, block the bottoms of the holes with "gimp", a rope-like product made from spongey plastic foam that is used as backing when caulking large gaps around new windows. Blue insulating foam (Styrofoam SM is the trademark) whittled down into tapered plugs also works well but gimp is a bit easier to handle.
— David Weatherston
Towser