
Budge's Deck Repairs – Non-Skid Paint
Budge, Bob Honsberger's Mark II no 322, had two significant areas of deck delamination plus general deterioration of the non-skid. Bob's notes describe a labour-intensive but inexpensive repair process. The photos show the repair after five years.
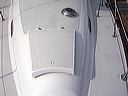
Forehatch & deck
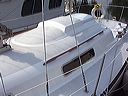
Main cabin & deck
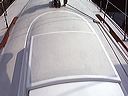
Companion spray hood
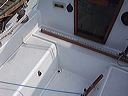
Cockpit
"At the time of purchase, it was apparent from my survey that there were two areas of soft, rotten core. However, overall, the deck and cabin top were quite sound. One area was on the cabin top, relatively close to the solar vent and measured 16 square inches. The other spot was on the starboard side deck in proximity to the aft stanchion and measured approximately 4" x 12". Both areas were entirely within the non-skid pattern.
Although the damaged areas were small, I decided to re-coat all the non-skid, which had lost most of its non-skid and cosmetic qualities.
Core removal – On the cabin top, I used a grinder as the area was quite small. On the side deck, I used a circular saw ( carbide tipped) for the most of the cut, finishing off with the grinder. Glass material removed this way is sometimes bonded back in place, but as all the non-skid areas would be re-coated, I didn’t do this. The cutout edge was tapered so as to provide additional surface for the patch.
The rotten core was removed back to dry, sound core. The new core was cut to size and installed with polyester resin and fibreglass layers to a level within a few millimeters of the finished deck. To finish, I used MarineTex reinforced epoxy. Although this is tough material to work with, particularly sanding, it is durable and will stay put even when feather-edged.
Non-skid coating – Preparation of the surface is important. I used a scrub brush with a solution of TSP to thoroughly clean the non-skid followed up with a wipe-down of acetone.
Major time was spent on masking the smooth gelcoat area from the non-skid to be coated. Following the radius corners is very time-consuming. I found the best method is to overlap these radius corners with masking tape and then use a hobby knife to cut, following the original.
Application of the two-part coating goes quite quickly using a special open-cell roller which applies the rubber granules in suspension with the polyurethane. Two coats are recommended.
The particular coating I used was a light grey in colour, although white and other colours are available.
Estimated time for the entire project – 25 hours (good thing I am retired)
Estimated material cost – $200.00
Canadian source for coating material # M22UV Exterior Anti-Slip Coating and roller is Polycoatings. A similar product is available from Durabak in the US.
After 5 years, the material has held up really well. I must note that the non-skid is aggressive and if you apply it to your cockpit locker covers, you better have cushions.
– Bob Honsberger, Budge June, 2005