Repairing a rotten cockpit sole
Back in 2008 I posted a question on the Forum regarding the repair of a rotten cockpit sole, and subsequently effected the repairs. Since they appear to have been effective (survived 40+knot winds and rough waters of Georgia Strait), I thought I'd record what I did in case others might find it useful.
Passtime is a Mark 4, with an Edson wheel steering.
Symptoms: dark brown water in the bilge.
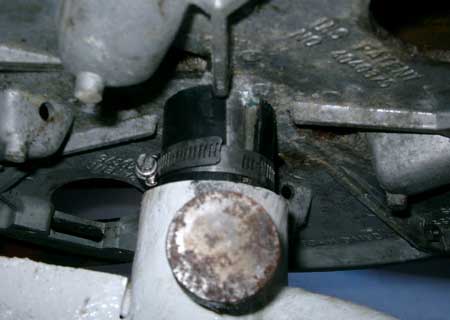
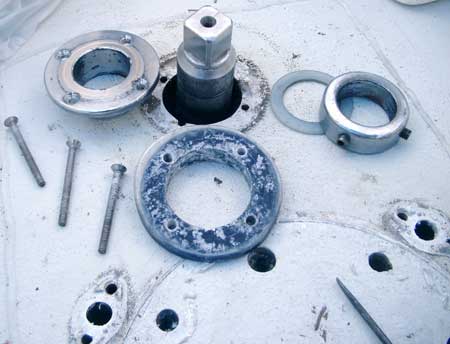
On investigation, identified the means of entry was through the rudder-post fitting in the cockpit sole, supporting the head of the rudder post. When the wheel steering was installed, a hole had been cut through the cockpit sole, but not sealed in any way, so the water had access to the plywood core. Essentially, the cockpit sole in the back two-thirds of the cockpit consists of the upper glass deck, about 1-11/-32-inch plywood core, and the bottom glass skin; the two glass skins are each about 15/32-inch . The rudder post head fitting is secured in place by four bolts.
I did not want to take off the top glass skin because I didn't feel I had the skills to replace it and make a good job. I also wanted to do the repairs in the water (boats are left in the water year-round on the wet coast -Vancouver, BC, area - and storage on the hard expensive).
So:
1. Covered the cockpit with a tarp to keep out the rain – started the process in March 2008.
2. Removed all the wheel steering stuff in the cockpit, including the pedestal, which is bolted to the deck by four bolts.
3. Before removing the rudderhead fitting, I measured the distance between the bottom of the quadrant and the top of the tube in the hull (roughly 1½"); cut an equal length of 1¼" black ABS pipe which was cut in half lengthwise and fitted it into the space, then secured in place around the rudder post with a hose clamp. This was to prevent the rudder from dropping down when the rudder head fitting was removed.
4. Removed the rudderhead fitting from the cockpit – a regular Allen key did the trick, which gets the top off. Then removed the four bolts to remove the rest – this was a bit tricky, getting a spanner onto the nuts under the deck – but it is doable.
5. What a mess – the plywood core was horribly rotten.
6. There were now several holes in the cockpit sole, but not enough to dry out the core.
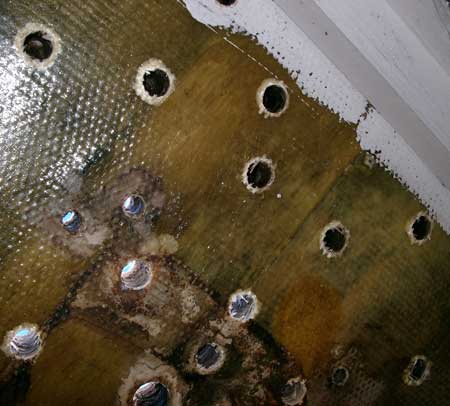
7. Drilled ¾" holes up from underneath the cockpit sole on approximately a six-inch grid. Used a right-angle adapter on the drill to help accessibility.
8. Patiently removed as much of the rotten core as could be reached through the holes using bits of wire as hooks, plus a strong vacuum. Got a lot of stuff out.
9. Placed an electric heater under the cockpit sole, had a good blower and a switch to shut it off in event of tipping, and left it on for about two months, each week prying all the holes and vacuuming to remove the rotten core. Probably spent $100 on increased hydro bills.
10. I ran the electricity through the boat's AC system; this turned out not to have been a good idea because when I later hauled out the boat, a large part of the bottom paint fell off the keel, which then had to be repainted with primer, build-up coats and bottom paint. I should have plugged the heater directly into the shore power and bypassed the boat system. I'm assuming I have a bit of electrical leakage I have to track down and fix sometime.
11. Figured the total volume of the void was about three litres and believe most (but not all) of the rotten material was removed.
12. Once I felt all the stuff left was dry (essentially stuck my pinky in the larger holes and felt around), all the holes that had been drilled were plugged with short pieces of ¾" dowel, pushed well into the holes from underneath, and then skimmed with West System epoxy thickened with 404 filler to seal off the holes. This included all the holes for the pedestal bolts etc that would later need to be drilled out again. The smaller holes that had bolts through them were similarly sealed up with thickened epoxy (but without the dowel).
13. The next problem was the large hole around the rudder post. Essentially I built up a dam of thickened epoxy; I cut up a plastic yogurt container and used it as a form as I built up the layers over a period of a couple of days, then when all that was left was a small gap at the top, I just filled it up with thickened epoxy.
14. So now I had a void of about three litres' capacity to fill, with several fill holes left through the top skin of the cockpit sole. It still contained some dried-out rotten plywood that I couldn't fish out, but most of it was gone.
15. I started to fill the void with Rot-fix because it has a lower viscosity than regular epoxy, and I wanted it to soak into the remaining rotten plywood. I used roughly one-and-a-half litres spread over a couple of days of pouring a bit at a time to let it soak in. Underneath the cockpit I had a good strong fan blowing to help keep the sole cool; it was May by now, but still cool. There was very little heat build-up, but I did keep a close eye on it.
16. Next day I completed the pour with System Three Cold Cure epoxy (the same company that makes Rot-Fix so I figured they should be compatible); it took just a little less than one-and-a-half litres. Again – kept a real close eye that there was no excessive heat build up.
17. A couple of days later I tapped out the entire cockpit sole and did find one small void which I filled by drilling two very small holes, one at each extreme of the void, and used a syringe to fill the void with epoxy. Later topped the holes up with gel coat, so not too noticeable.
18. Then drilled out the bolt holes again ready to install the hardware that had been removed at the start.
19. I have to admit that it was tricky to get the four bolt holes that secured the bearing for the head of the rudder post installed, but it got done eventually; just a little nautical language seemed to expedite the affair. One really does have to be something of a contortionist to work underneath the cockpit sole.
20. The hardware was re-installed using LifeCaulk to seal the hardware to the deck. I had taken the opportunity (while the sole was drying out) of sandblasting the pedestal and repainting with matt black Endura. Looks smart again.
– Roger Gibb, Passtime, Mk IV